IInitializeSystem

从这章这开始我们以一个小案例分章介绍Entitas为我们提供的五种类型的System。
案例的主要功能比较简单,大致的流程如下:

  • 在游戏启动时在屏幕上创建一个站立的小熊。
  • 点击键盘上的左右按键时将小熊切换成一个对应方向的Sprite,朝对应方向移动并实时打印位置信息。松开左右按键时切换回站立的小熊Sprite,结束打印位置信息。
  • 结束游戏输出一个”Game Over!”信息。
    这一章我们将在游戏中通过代码创建一个小熊的GameObject,并可以看到小熊Entity的一些组件信息。

    案例准备

    创建ViewComponent.cs

  • ViewComponent 记录小熊的GameObject
  • SpriteComponent 记录小熊的Sprite名称数据
  • PositionComponent 记录小熊的Position数据
  • DirectionComponent 记录小熊的方向数据
  • MoveSpeedComponent 记录小熊的移动速度数据 (但是这里需要注意,这个组件一旦添加到小熊身上就会移动,不需要移动时需将这个组件移除,这就是我们将Component时提到过的通过修改组件来改变Entity的行为)
    多个组件可以放在一个文件中可以分成多个文件,我们这里就放在一个文件中 ViewComponent.cs。
    1
    2
    3
    4
    5
    6
    7
    8
    9
    10
    11
    12
    13
    14
    15
    16
    17
    18
    19
    20
    21
    22
    23
    24
    25
    26
    27
    28
    29
    30
    31
    32
    33
    34
    35
    36
    37
    38
    39
    40
    41
    42
    43
    44
    45
    46
    47
    48
    49
    50
    51
    52
    53
    54
    55
    56
    57
    using Entitas;
    using UnityEngine;

    /// <summary>
    /// View组件
    /// </summary>
    [Game]
    public class ViewComponent : IComponent
    {
    public GameObject gameObject;
    }

    /// <summary>
    /// Sprite组件
    /// </summary>
    [Game]
    public class SpriteComponent : IComponent
    {
    public string value;
    }

    /// <summary>
    /// Position组件
    /// </summary>
    [Game]
    public class PositionComponent : IComponent
    {
    public Vector2 value;
    }

    /// <summary>
    /// MoveSpeed组件
    /// </summary>
    [Game]
    public class MoveSpeedComponent : IComponent
    {
    public float value;
    }

    /// <summary>
    /// Direction组件
    /// </summary>
    [Game]
    public class DirectionComponent : IComponent
    {
    /// <summary>
    /// 表示站立,向左,向右三种朝向状态
    /// </summary>
    public enum EDirection
    {
    stand,
    left,
    right,
    }

    public EDirection value;
    }
  • 注意:每次添加新的组件代码之后需要重新生成一下代码才会被Entitas引用。*

创建AddSystem.cs IInitializeSystem

我们全局只需要一个小熊实体,并在游戏开始时就创建出来,所以需要继承IInitializeSystem这个接口,并实现Initialize()方法用来执行创建小熊的逻辑。
这个接口和MonoBehaviour生命周期中的Start()方法类似。但是和MonoBehaviour不同的是如果我们有多个继承自IInitializeSystem接口的System,执行顺序是先添加到Systems中的先执行。

1
2
3
4
5
6
7
8
9
10
11
12
13
14
15
16
17
18
19
20
21
22
23
24
25
26
27
28
29
30
31
32
33
34
35
36
37
38
39
using Entitas;
using Entitas.Unity;
using UnityEngine;

public class AddViewSystem : IInitializeSystem
{
//创建一个小熊容器
readonly Transform gameContainer = new GameObject("Game Container").transform;

//需要处理的Component都是属于GameContext,所以我们需要从Contexts中拿到Game Context.
readonly GameContext _context;

public AddViewSystem(Contexts contexts)
{
_context = contexts.game;
}

public void Initialize()
{
var entity = _context.CreateEntity();
GameObject go = new GameObject("Game Entity");
go.transform.SetParent(gameContainer,false);

//添加ViewComponent并为ViewComponent的gameObject赋值
entity.AddView(go);

//添加PositionComponent并为PositionComponent的value字段赋值
entity.AddPosition(Vector2.zero);

//添加SpriteComponent并为SpriteComponent的value字段赋值
entity.AddSprite("monkey_stand");

//添加DirectionComponent并为DirectionComponent的value字段赋值
entity.AddDirection(DirectionComponent.EDirection.stand);

//将Entity链接到GameObject上
go.Link(entity);
}
}

拓展:C#中的readonly

顾名思义,只读字段,就是说在程序运转过程中,程序中能够读取这个字段的值,而不能修正它的值。在C#中能够运用readonly关键词来解说一个只读字段。
在C#中运用只读字段主要有以下几个关键:
  (1)只读字段能够在解说的一起赋值或者在类的结构办法中给其赋值;
  (2)除了结构办法外,其他地方不能够修正只读字段的值;
  (3)只读字段的特点只能有get访问器,不能有set,这是显而易见的;
只读字段与常量的区别:
  常量(运用const关键字解说)只能在声明的一起初始化(赋值)。
  readonly字段能够在声明或结构函数中初始化。因而,依据所运用的结构函数,readonly字段可能具有不同的值。

GameSystems.cs

我们还需要一个用来管理System的Systems。并将刚才创建的AddSystem.cs添加到Systems中。
我们为了能在Unity编辑器中看到System的信息,所以GameSystems继承自Feature。

1
2
3
4
5
6
7
8
9
10
using Entitas;

public class GameSystems : Feature
{
public GameSystems(Contexts contexts) : base("Game Systems")
{
/* -- Init System -- */
Add(new AddViewSystem(contexts));
}
}

GameController.cs

我们写了这么多代码但是Unity开始运行的时候并不会执行啊,所以我们还需要有一个继承自MonoBehaviour的脚本来负责创建,初始化和执行各个System。
我们就叫GameController.cs吧。

1
2
3
4
5
6
7
8
9
10
11
12
13
14
15
16
using Entitas;
using UnityEngine;

public class GameController : MonoBehaviour
{
Systems _systems;
Contexts _contexts;

private void Start()
{
_contexts = Contexts.sharedInstance;
_systems = new GameSystems(_contexts);

_systems.Initialize();
}
}
  • 点击运行后,我们可以在Hierarchy面板中看到这些东西。
    3.png
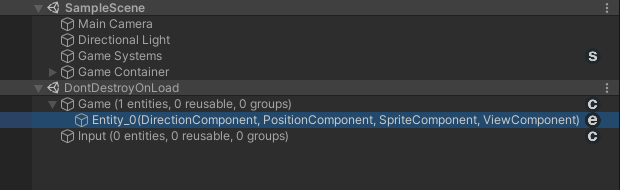
  • 选中Hierarchy面板中Game然后可以在Inspector面板中看到这些信息。
    ![4.png]/img/ECS/4.png)
    这里列出来了当前活动的Entity和被回收的Entity数量,创建Entity和回收所有Entity的按钮。
  • Game下的Entity_0然后可以在Inspector面板中看到这些信息。
    5.png
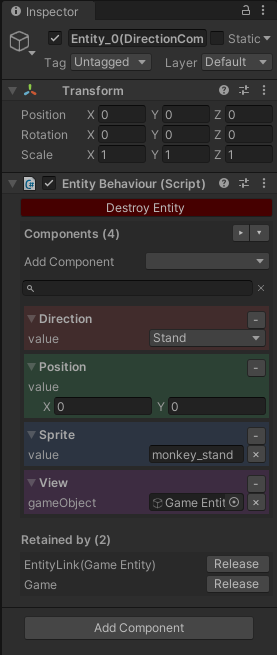
    其中包含了刚才我们在AddViewSystem中为其实体添加的组件信息和数据信息。
  • 最后选中Hierarchy面板中Game Systems然后可以在Inspector面板中看到这些信息了。
    6.png
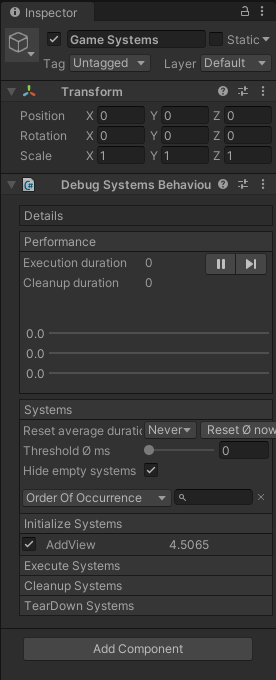
    可以看到每种类型的System列表,System的性能开销。这里会每帧动态刷新。

    总结

  • IInitializeSystem 会在游戏开始之前执行一次。在这里设置初始游戏状态,类似于Unity的Start()方法。创建游戏中的全局实体(例如,用于访问配置数据)*

ReactiveSystem<Entity>

这一章我们通过ReactiveSystem系统将Entity上组件的数据和GameObject联系起来。

ReactiveSystem

ReactiveSystem和其他System不同的是它继承类而不是实现接口。
Entitas为每个Context生成Entity类型,例如GameEntity,InputEntity。
ReactiveSystem只对指定的Entity类型产生响应。
但是同一种类型的Entity还是有很多,我们并不希望处理每一个,而是处理某些Component发生变化的Entity。
所以ReactiveSystem必须重写三个方法GetTrigger(),Filter(),Execute()。

  • GetTrigger() 返回一个ICollector对象用来收集ReactiveSystem需要处理的那一部分Entity
  • Filter() 对ICollector返回的实体进行再一次检查确保被Execute()方法处理前已经添加了需要的Component。
  • Execute() 需要对Entity执行的逻辑

    RenderSpriteSystem.cs ReactiveSystem

    首先需要将SpriteComponent组件上图片名称赋值给SpriteRenderer。
    要实现这个功能我们使用IInitializeSystem系统也可以实现,但是之后我们还需要在按下键盘上左右键的时候切换图片,所以需要ReactiveSystem系。
    RenderSpriteSystem将收集那些SpriteComponent发生变化的Entity,将图片赋值到SpriteRenderer。
    1
    2
    3
    4
    5
    6
    7
    8
    9
    10
    11
    12
    13
    14
    15
    16
    17
    18
    19
    20
    21
    22
    23
    24
    25
    26
    27
    28
    29
    30
    31
    32
    33
    34
    35
    36
    37
    38
    39
    40
    using Entitas;
    using System.Collections.Generic;
    using UnityEngine;

    /// <summary>
    /// RenderSpriteSystem
    /// </summary>
    public class RenderSpriteSystem : ReactiveSystem<GameEntity>
    {
    public RenderSpriteSystem(Contexts contexts) : base(contexts.game)
    {

    }

    protected override void Execute(List<GameEntity> entities)
    {
    foreach (var item in entities)
    {
    //为每个符合条件的Entity的SpriteRender赋值
    SpriteRenderer sr = item.view.gameObject.GetComponent<SpriteRenderer>();
    if (sr == null)
    {
    sr = item.view.gameObject.AddComponent<SpriteRenderer>();
    }
    sr.sprite = Resources.Load<Sprite>(item.sprite.value);
    }
    }

    protected override bool Filter(GameEntity entity)
    {
    //确定Entity是否有SpriteComponent和ViewComponent
    return entity.hasSprite && entity.hasView;
    }

    protected override ICollector<GameEntity> GetTrigger(IContext<GameEntity> context)
    {
    // 创建一个ICollector用来收集所有SpriteComponent变化的GameEntity
    return context.CreateCollector(GameMatcher.Sprite);
    }
    }

RenderPositionSystem.cs ReactiveSystem

还需要一个RenderPositionSystem用来为那些PositionComponent发生变化的Entity刷新位置。

1
2
3
4
5
6
7
8
9
10
11
12
13
14
15
16
17
18
19
20
21
22
23
24
25
26
27
28
29
30
31
32
33
34
35
36
using Entitas;
using System.Collections.Generic;

/// <summary>
/// RenderPositionSystem
/// </summary>
public class RenderPositionSystem : ReactiveSystem<GameEntity>
{
readonly GameContext _context;

public RenderPositionSystem(Contexts contexts) : base(contexts.game)
{
_context = contexts.game;
}

protected override void Execute(List<GameEntity> entities)
{
foreach (var item in entities)
{
//为每个符合条件的Entity刷新位置
item.view.gameObject.transform.position = item.position.value;
}
}

protected override bool Filter(GameEntity entity)
{
//确定Entity是否有PositionComponent和ViewComponent
return entity.hasPosition && entity.hasView;
}

protected override ICollector<GameEntity> GetTrigger(IContext<GameEntity> context)
{
//创建一个ICollector用来收集所有PositionComponent变化的GameEntity
return context.CreateCollector(GameMatcher.Position);
}
}

RenderDirectionSystem.cs ReactiveSystem

最后还需要一个用来处理DirectionComponent的System,逻辑和上面的基本相同。
只是在逻辑执行时,因为我们让小熊转向就是将小熊的图片切换成对应朝向的图片的逻辑。
所以RenderDirectionSystem就是根据DirectionComponent的数据切换SpriteComponent的数据。
然后就交由RenderSpriteSystem来处理图片切换的逻辑了。

1
2
3
4
5
6
7
8
9
10
11
12
13
14
15
16
17
18
19
20
21
22
23
24
25
26
27
28
29
30
31
32
33
34
35
36
37
38
39
40
41
42
43
44
45
46
47
48
49
50
51
52
using Entitas;
using System.Collections.Generic;
/// <summary>
/// RenderDirectionSystem
/// </summary>
public class RenderDirectionSystem : ReactiveSystem<GameEntity>
{
public RenderDirectionSystem(Contexts contexts) : base(contexts.game)
{

}

protected override void Execute(List<GameEntity> entities)
{
foreach (var item in entities)
{
//为每个符合条件的Entity改变SpriteComponent数据
string spriteName = "";
switch (item.direction.value)
{
case DirectionComponent.EDirection.stand:
spriteName = "monkey_stand";
break;
case DirectionComponent.EDirection.left:
spriteName = "monkey_left";
break;
case DirectionComponent.EDirection.right:
spriteName = "monkey_right";
break;
default:
break;
}

if (item.sprite.value != spriteName)
{
item.ReplaceSprite(spriteName);
}
}
}

protected override bool Filter(GameEntity entity)
{
//确定Entity是否有DirectionComponent和ViewComponent
return entity.hasDirection && entity.hasView;
}

protected override ICollector<GameEntity> GetTrigger(IContext<GameEntity> context)
{
//创建一个ICollector用来收集所有DirectionComponent变化的GameEntity
return context.CreateCollector(GameMatcher.Direction);
}
}

最后不要忘了将我们新创建的三个系统添加到GameSystems中,并在GameController的Update()方法中每帧执行我们的系统

1
2
3
4
5
6
7
8
9
10
11
12
13
14
15
using Entitas;

public class GameSystems : Feature
{
public GameSystems(Contexts contexts) : base("Game Systems")
{
/* -- Init System -- */
Add(new AddViewSystem(contexts));

/* -- Execute System -- */
Add(new RenderPositionSystem(contexts));
Add(new RenderDirectionSystem(contexts));
Add(new RenderSpriteSystem(contexts));
}
}

现在在编辑器中运行一下就可以在Game视图中看到我们的人物
7.png
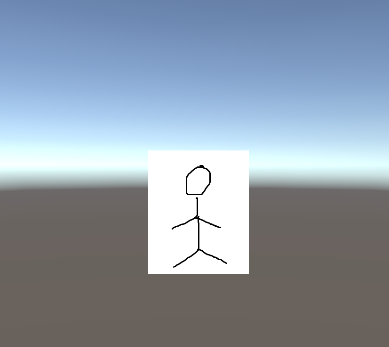
但是现在按键盘上任何按键人物还不会有反应,但是我们可以在Hierarchy面板中选中这个Entity。
然后调整DirectionComponent和PositionComponent的数值就可以看到人物会有响应了。
8.png

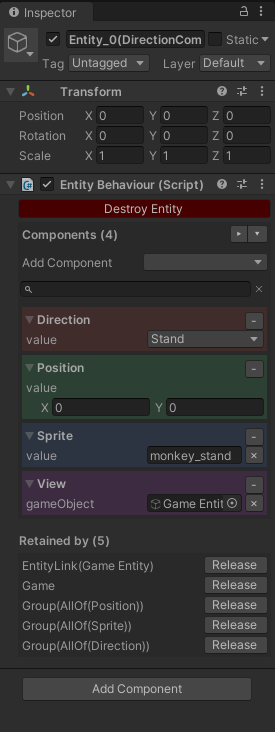
总结: ReactiveSystem就是实时收集一些自己感兴趣的组件发生变化的Entity,并执行相应的逻辑。


IExecuteSystem

这个系统也比较简单,和IInitializeSystem很相似,区别就是IInitializeSystem是游戏开始时执行一次Initialize()方法,IExecuteSystem时每帧执行一次Execute()方法。
类似与MonoBehaviour生命周期中的Update()方法。

ArrowStateComponent.cs

这里我们主要是想收集键盘的输入信息,所以我们和之前Game Context分开,在Input Context下创建两个分别记录左键和右键状态的组件,同时左键和右键的状态组件不需要多个所以我们[Unique]属性让组件成为单例。

1
2
3
4
5
6
7
8
9
10
11
12
13
14
15
16
17
18
19
20
21
22
23
24
25
26
27
28
29
using Entitas;
using Entitas.CodeGeneration.Attributes;

public enum EArrowState
{
None,
Down,
Up,
}

/// <summary>
/// LeftArrowStateComponent
/// </summary>
[Input]
[Unique]
public class LeftArrowStateComponent : IComponent
{
public EArrowState state;
}

/// <summary>
/// RightArrowStateComponent
/// </summary>
[Input]
[Unique]
public class RightArrowStateComponent : IComponent
{
public EArrowState state;
}

InputDeviceSystem.cs IInitializeSystem,IExecuteSystem

注意:
InputDeviceSystem.cs 同时实现IInitializeSystem,IExecuteSystem两个接口,需要在IInitializeSystem接口的Initialize()方法中初始化LeftArrowStateComponent,RightArrowStateComponent两个组件。
然后在IExecuteSystem接口的Execute()方法中检测是否按下键盘的左右键。

1
2
3
4
5
6
7
8
9
10
11
12
13
14
15
16
17
18
19
20
21
22
23
24
25
26
27
28
29
30
31
32
33
34
35
36
37
38
39
40
41
42
43
44
45
46
47
48
49
using Entitas;
using UnityEngine;
/// <summary>
/// InputDeviceSystem
/// </summary>
public class InputDeviceSystem : IInitializeSystem,IExecuteSystem
{
readonly InputContext _context;

public InputDeviceSystem(Contexts contexts)
{
_context = contexts.input;
}

public void Initialize()
{
_context.SetLeftArrowState(EArrowState.None);
_context.SetRightArrowState(EArrowState.None);
}

public void Execute()
{
if (Input.GetKey(KeyCode.LeftArrow) || Input.GetKeyDown(KeyCode.LeftArrow))
{
_context.ReplaceLeftArrowState(EArrowState.Down);
}
else if (Input.GetKeyUp(KeyCode.LeftArrow))
{
_context.ReplaceLeftArrowState(EArrowState.Up);
}
else
{
_context.ReplaceLeftArrowState(EArrowState.None);
}

if (Input.GetKey(KeyCode.RightArrow) || Input.GetKeyDown(KeyCode.RightArrow))
{
_context.ReplaceRightArrowState(EArrowState.Down);
}
else if (Input.GetKeyUp(KeyCode.RightArrow))
{
_context.ReplaceRightArrowState(EArrowState.Up);
}
else
{
_context.ReplaceRightArrowState(EArrowState.None);
}
}
}

MovementSystem.cs ReactiveSystem

当左右按键按下时需要移动Entity。那么需要一个速度组件。

1
2
3
4
5
6
7
8
9
using Entitas;
/// <summary>
/// MoveSpeedComponent
/// </summary>
[Game]
public class MoveSpeedComponent : IComponent
{
public float value;
}

然后在Entity有了MoveSpeedComponent组件之后需要根据每帧的间隔时间和速度确定移动距离,并改变Entity的PositionComponent最后交由RenderPositionSystem刷新位置。

1
2
3
4
5
6
7
8
9
10
11
12
13
14
15
16
17
18
19
20
21
22
23
24
25
26
27
28
29
30
31
32
33
34
35
36
37
using Entitas;
using System.Collections.Generic;
using UnityEngine;
/// <summary>
/// MovementSystem
/// </summary>
public class MovementSystem : ReactiveSystem<GameEntity>
{
public MovementSystem(Contexts contexts) : base(contexts.game)
{

}

protected override void Execute(List<GameEntity> entities)
{
foreach (var item in entities)
{
float interval = Time.deltaTime;
//移动距离
float moveInterval = interval * item.moveSpeed.value;
Vector2 position = item.position.value;
//移动完成后的坐标信息
position.x += moveInterval;
item.ReplacePosition(position);
}
}

protected override bool Filter(GameEntity entity)
{
return entity.hasMoveSpeed;
}

protected override ICollector<GameEntity> GetTrigger(IContext<GameEntity> context)
{
return context.CreateCollector(GameMatcher.MoveSpeed);
}
}

CommandMoveSystem.cs ReactiveSystem

通过InputDeviceSystem.cs可以检测到左右按键按下松开状态了,但是Game Context中的Entity还并没有速度值所以现在还没有办法移动,所以需要在LeftArrowStateComponent,RightArrowStateComponent两个组件发生变化时改变GameEntity的速度值。
这里我们简单处理,如果向左移动速度值设置成负值,向右移动速度值设置成正值,同时设置物体的DirectionComponent组件。
如果左右两个按键都没有按下时把小熊的MoveSpeedComponent移除小熊就会停下,并把DirectionComponent设置成站立状态。

1
2
3
4
5
6
7
8
9
10
11
12
13
14
15
16
17
18
19
20
21
22
23
24
25
26
27
28
29
30
31
32
33
34
35
36
37
38
39
40
41
42
43
44
45
46
47
48
49
50
51
52
53
54
55
56
57
58
59
60
61
62
using Entitas;
using System.Collections.Generic;

/// <summary>
/// CommandMoveSystem
/// </summary>
public class CommandMoveSystem : ReactiveSystem<InputEntity>
{
readonly IGroup<GameEntity> moveEntitys;

public CommandMoveSystem(Contexts contexts) : base(contexts.input)
{
//找到
int[] allof = { GameComponentsLookup.View, GameComponentsLookup.Direction };
moveEntitys = contexts.game.GetGroup(GameMatcher.AllOf(allof));
}

protected override void Execute(List<InputEntity> entities)
{
foreach (var item in entities)
{
//左键或右键Up状态
if ((item.hasLeftArrowState && item.leftArrowState.state == EArrowState.Up) ||
(item.hasRightArrowState && item.rightArrowState.state == EArrowState.Up))
{
foreach (var entity in moveEntitys)
{
entity.ReplaceDirection(DirectionComponent.EDirection.stand);
entity.RemoveMoveSpeed();
}
}
else if (item.hasLeftArrowState && item.leftArrowState.state == EArrowState.Down)
{
foreach (var entity in moveEntitys)
{
entity.ReplaceDirection(DirectionComponent.EDirection.left);
entity.ReplaceMoveSpeed(-3.0f);
}
}
else if (item.hasRightArrowState && item.rightArrowState.state == EArrowState.Down)
{
foreach (var entity in moveEntitys)
{
entity.ReplaceDirection(DirectionComponent.EDirection.right);
entity.ReplaceMoveSpeed(3.0f);
}
}
}
}

protected override bool Filter(InputEntity entity)
{
return (entity.hasLeftArrowState && entity.leftArrowState.state != EArrowState.None)
|| (entity.hasRightArrowState && entity.rightArrowState.state != EArrowState.None);
}

protected override ICollector<InputEntity> GetTrigger(IContext<InputEntity> context)
{
int[] anyof = { InputComponentsLookup.LeftArrowState, InputComponentsLookup.RightArrowState };
return context.CreateCollector(InputMatcher.AnyOf(anyof));
}
}

最后还是一样需要将新建的System加到GameSystems中。

1
2
3
4
5
6
7
8
9
10
11
12
13
14
15
16
17
18
19
using Entitas;

public class GameSystems : Feature
{
public GameSystems(Contexts contexts) : base("Game Systems")
{
/* -- Init System -- */
Add(new AddViewSystem(contexts));

/* -- Execute System -- */
Add(new RenderPositionSystem(contexts));
Add(new RenderDirectionSystem(contexts));
Add(new RenderSpriteSystem(contexts));

Add(new InputDeviceSystem(contexts));
Add(new CommandMoveSystem(contexts));
Add(new MovementSystem(contexts));
}
}

现在可以回到Unity运行一下,按下左右按键时物体已经可以移动了。
现在案例已经基本完成了,只差最后一步在物体移动时实时打印位置了。
通过处理移动的过程可以看出Entitas的核心思想是Component只需记录数据或者状态,专门的事交由专门的System处理,Entity只是为了承载Component并无其他作用。

总结:IExecuteSystem 在游戏运行后每帧执行一次,可以在这里处理类似Input等事件。


ICleanupSystem

这一章开始实现案例最后一个功能,实时打印物体的位置信息。
可能你会问打印位置信息和Entitas有什么关系,一句Debug.Log()不就完事了,是的!如果是在Unity环境下是这样一句话就行了,但是Entitas的开发环境是不依赖于Untiy的,这样的好处是如果有服务器和客户端公用一套战斗逻辑的时候,Entitas从客户端移植到服务器就会很方便,但是因为刚才在代码中插入了Debug.Log()导致需要修改源码或者服务器引入UnityEngine.dll。

ICleanupSystem

这个系统主要是在每帧的逻辑执行结束之后执行Cleanup()做一些清理工作,是的,这个系统也是每帧执行一次,那么它和IExecuteSystem又有什么区别呢。
你可以对照一下MonoBehaviour生命周期中的Update()和LateUpdate()的区别。
所以Systems.Execute()调用之后才能调用Systems.Cleanup()方法。或者干脆将Systems.Cleanup()方法放在LateUpdate()中调用。

LogMessageComponent.cs

首先我们需要一个LogMessageComponent用来记录需要打印的数据信息。

ShowLogMessageSystem.cs ReactiveSystem

1
2
3
4
5
6
7
8
9
10
11
12
13
14
15
16
17
18
19
20
21
22
23
24
25
26
27
28
29
30
31
32
using Entitas;
using System.Collections.Generic;
using UnityEngine;
/// <summary>
/// ShowLogMessageSystem
/// </summary>
public class ShowLogMessageSystem : ReactiveSystem<GameEntity>
{
public ShowLogMessageSystem(Contexts contexts) : base(contexts.game)
{

}

protected override void Execute(List<GameEntity> entities)
{
foreach (var item in entities)
{
Debug.Log(item.logMessage.message);
//item.isDestoryLog = true;
}
}

protected override bool Filter(GameEntity entity)
{
return entity.hasLogMessage;
}

protected override ICollector<GameEntity> GetTrigger(IContext<GameEntity> context)
{
return context.CreateCollector(GameMatcher.LogMessage);
}
}

还需要在RenderPositionSystem中刷新GameObject位置的时候创建一个拥有LogMessageComponent的Entity。

1
2
3
4
5
6
7
8
9
10
11
12
13
14
15
public class RenderPositionSystem : ReactiveSystem<GameEntity>
{
...
protected override void Execute(List<GameEntity> entities)
{
foreach (var item in entities)
{
//为每个符合条件的Entity刷新位置
item.view.gameObject.transform.position = item.position.value;
//创建一个Entity并添加LogMessageComponeent
_context.CreateEntity().AddLogMessage(string.Format("position = {0},{1}",item.position.value.x, item.position.value.y));
}
}
...
}

注意:因为这里创建的GameEntity只有LogMessageComponent,没有ViewComponent, SpriteComponent等所以不会被RenderPositionSystem等其他System处理。
最后将ShowLogMessageSystem.cs添加到GameSystems中。

1
2
3
4
5
6
7
8
9
public class GameSystems : Feature
{
public GameSystems(Contexts contexts) : base("Game Systems")
{
...
Add(new ShowLogMessageSystem(contexts));
}

}

回到Unity编辑器运行一下,可以在控制台看到打印信息了,但是有一个很可怕的情况出现了,随着我们的运行GameEntity越来越多,这些Entity会创建只是包含了我们的输出信息,之后就再也没用了,那么我们需要在信息被输出之后将这个GameEntity清除掉。

DestoryLogMessageSystem.cs ICleanupSystem

我们在ShowLogMessageSystem中会输出信息,ShowLogMessageSystem是继承ReactiveSystem,所以可以在ICleanupSystem中清理所有拥有LogMessageComponent的实体,因为ReactiveSystem实现了IExecuteSystem接口的Execute()方法,而前面我们也说过了ICleanupSystem 的执行会晚于IExecuteSystem。

1
2
3
4
5
6
7
8
9
10
11
12
13
14
15
16
17
18
19
20
21
22
using Entitas;
/// <summary>
/// DestoryLogMessageSystem
/// </summary>
public class DestoryLogMessageSystem : ICleanupSystem
{
readonly GameContext _context;
readonly IGroup<GameEntity> messageEntity;
public DestoryLogMessageSystem(Contexts contexts)
{
_context = contexts.game;
messageEntity = _context.GetGroup(GameMatcher.LogMessage);
}

public void Cleanup()
{
foreach (var item in messageEntity.GetEntities())
{
item.Destroy();
}
}
}

最后再将DestoryLogMessageSystem.cs添加到GameSystem中,并再GameController的LateUpdate()方法中执行Systems的Cleanup()方法

1
2
3
4
5
6
7
8
9
10
public class GameController : MonoBehaviour
{
...

void LateUpdate()
{
_systems.Cleanup();
}

}

总结: ICleanupSystem也是每帧执行的系统。不过从逻辑上区分这个system是为了我们在执行完所有的IExecuteSystem之后执行的逻辑所设立的,用来做一些数据的清理的作用.需要重写void Cleanup()方法; 将清理逻辑写在这个方法中。


ITearDownSystem

ITearDownSystem

ITearDownSystem在程序结束运行时运行一次TearDown()接口,可以在这个接口中执行一些数据保存,断开网络等操作。可以参考MonoBehaviour生命周期中的OnDestroy()。

MyTearDownSystem.cs ITearDownSystem

1
2
3
4
5
6
7
8
9
10
11
12
13
14
15
16
17
18
19
using Entitas;
using UnityEngine;
/// <summary>
/// MyTearDownSystem
/// </summary>
public class MyTearDownSystem : ITearDownSystem
{
readonly GameContext _context;

public MyTearDownSystem(Contexts contexts)
{
_context = null;
}

public void TearDown()
{
Debug.Log("Game Over!");
}
}

将MyTearDownSystem.cs添加到GameSystem中,并再GameController的OnDestroy()方法中执行Systems的TearDown()方法。